Phone-Controlled-Robot-Arm
Project maintained by Tigerfuzz Hosted on GitHub Pages — Theme by mattgraham
Phone-Controlled Robot Arm
The project I chose was to build and operate a robot arm using an Arduino and servo motors. The goal is to be able to control the arm through Bluetooth using a mobile app.

| Engineer | School | Area of Interest | Grade |
|---|---|---|---|
| Atri | Lick-Wilmerding High School | Electrical Engineering and Computer Science | Incoming Junior |
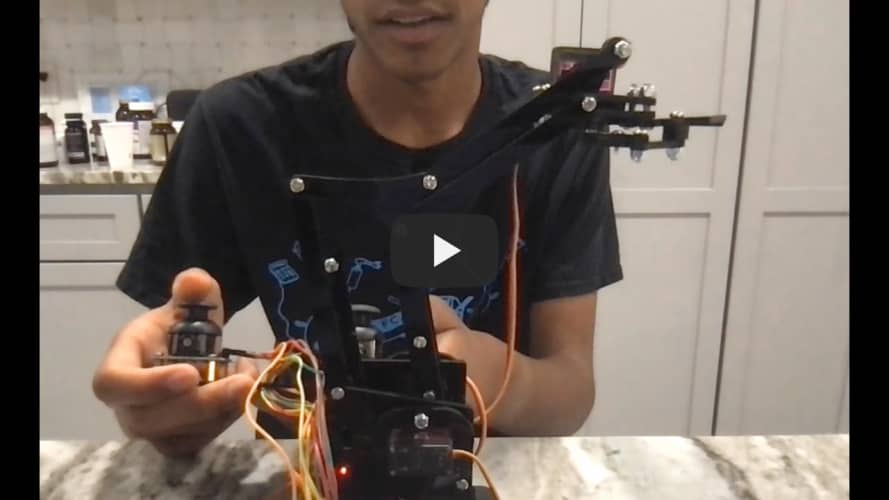
Final Milestone
My final milestone is my robot arm complete with HC-05 bluetooth mobile control and PS2 joystick control. The main premise of my project was to be able to control the robot arm wirelessly from a mobile device, and in this milestone I achieved that. I started with Bluetooth control, and writing some code to allow for bluetooth connection my Arduino. Once done, I developed an app on MIT App Inventor for wireless robot control and to commmunicate with the Arduino via Bluetooth. After I got my bluetooth app working with the robot, I transitioned to making a modification, using the PS2 joystick sensors. I wired each of the pins to the corresponding analog, ground and VCC pins and wrote a sketch file for control with the joysticks, which was similar to my potentiometer code but with many more variables and analog inputs. Through both the bluetooth and PS2 control parts of my project, I encountered a lot of problems. Namely the bluetooth module code had to be tweaked countless times to establish a bluetooth connection. Also, at first, I didn’t have access to an Android device, which was important because using bluetootth with MIT APP Inventor only works on Android (iOS has some privacy and secuirty featuers that don’t allow such direct bluetooth connections). With the PS2 joysticks, when using the library built for PS2 controller use on Arduino (PS2X_lib), the controller wasn’t being detected, even though my wiring was correct, so I had to alter my code quite a bit to work without the module.
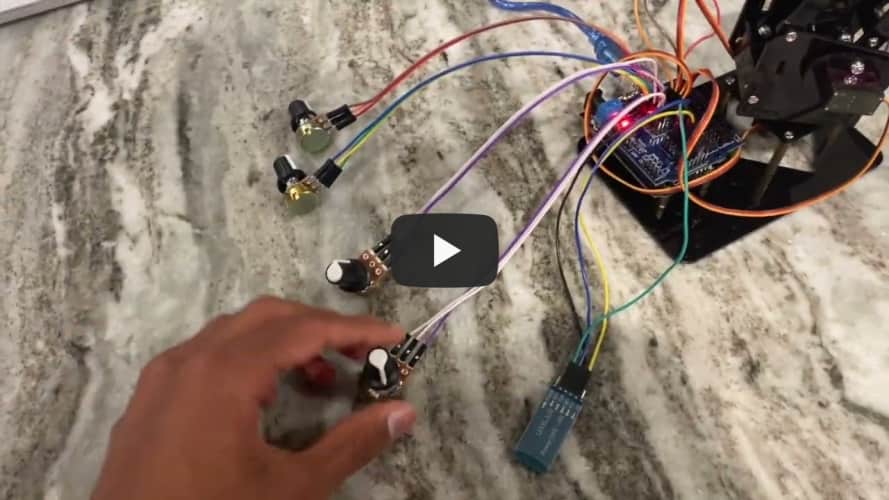
Second Milestone
My second milestone was fully assembling my robot arm and operating it via potentiometers. I started with separating all my screws into their various lengths and went step by step assembling my robot. I then mounted my Arduino onto the bottom plate of my robot, and connected my 4 servos and HC-05 bluetooth sensor to the sensor shield v5 board on top. After testing the ranges of motion for each of the servos in my robot arm, I wired four potentiometers to my sensor shield board’s analog, ground and VCC pins, and wrote a program that would read the values of the potentiometers and convert those readings into positions for my servos. Some challenges I ran into were with assembly, as there were many different lengths of screws and types of nuts, and I had mixed some of the placements of certain screws up. Because of this, I had to redo parts of my assembly, which took more time. Lock nuts were also very hard to fully screw in, and took lots of effortand time as well.
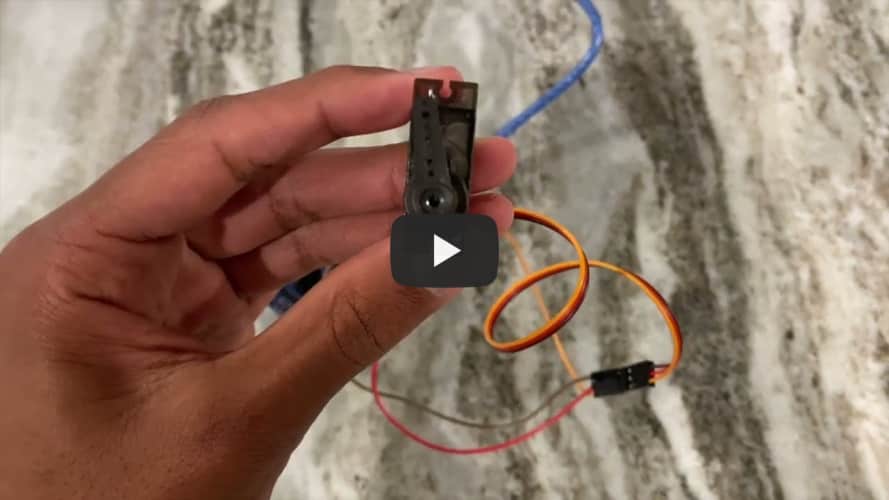
First Milestone
My first milestone was setting up and hooking up the Arduino Uno with a servo and a Bluetooth reciever. I first started with connecting my Arduino board with another board called the Arduino Sensor Shield v5, the sensor shield on top of the arduino. This will allow me to connect multiple servos at once very easily. I connected one servo to the sensor shield board and connected my Arduino to my computer to make sure my servo worked properly. I wrote a simple program to rotate a servo back and forth to test its range of motion and to experiment with coding servos. I ran into a couple of issues along the way. The first was from getting the error “Compilationerror: error 13 INTERNAL”, which came from not having the servo library installed. My other issue was with the sensor shield board, as when I connected a servo to the proper pins on the board, sometimes the servo would be unresponsive. I easily fixed this by using a different servo.
Code for bluetooth control with the HC-05 bluetooth module and an Android device:
#include <Servo.h>
Servo myservo1;  // create servo object to control a servo
Servo myservo2;
Servo myservo3;
Servo myservo4;
int pos1=90, pos2=90, pos3=90, pos4=90;  // define the variable of 4 servo angle and assign the initial value( that is the boot posture angle value)
char val;
int incomingByte = 0;          // Received data byte
String inputString = "";         // Used to store received content
boolean newLineReceived = false; //  Previous data end flag
boolean startBit  = false;  //Acceptance Agreement Start Sign
int num_reveice=0;


void setup()
{
  myservo1.attach(3);    // set the control pin of servo 1 to 3 digital I/0
  myservo2.attach(5);    // set the control pin of servo 1 to 3 digital I/0
  myservo3.attach(6);    // set the control pin of servo 1 to 3 digital I/0
  myservo4.attach(9);    // set the control pin of servo 1 to 3 digital I/0

  myservo1.write(pos1);
  myservo2.write(pos2);
  myservo3.write(pos3);
  myservo4.write(pos4);
  delay(1500);
  Serial.begin(9600); //  set the baud rate to 9600
}

void loop()
{
while (Serial.available())
  {
    incomingByte = Serial.read();              //One byte by byte, the next sentence is read into a string array to form a completed packet
    if (incomingByte == '%')
    {
      num_reveice = 0;
      startBit = true;
    }
    if (startBit == true)
    {
      num_reveice++;
      inputString += (char) incomingByte;
    }
    if (startBit == true && incomingByte == '#')
    {
      newLineReceived = true;
      startBit = false;
    }

    if(num_reveice >= 20)
    {
      num_reveice = 0;
      startBit = false;
      newLineReceived = false;
      inputString = "";
    }
  }

if(newLineReceived)
{
      Serial.println(inputString);
      if(inputString.substring(0,3)=="%4#"){
        Serial.println("Up");

         // raise the arm
        for(pos3;pos3<100;pos3++)
        {
          myservo3.write(pos3);
          delay(5);
        }
        delay(1500);

      }else if(inputString.substring(0,3)=="%5#"){
         Serial.println("Close");
        // close the claw
        for(pos4;pos4>45;pos4--)
        {
          myservo4.write(pos4);
        }
        delay(1000);


      }else if(inputString.substring(0,3)=="%7#"){


         Serial.println("Down");
         // Lower the arm
         for(pos3;pos3>40;pos3--)
         {
            myservo3.write(pos3);
            delay(5);
         }
         delay(1000);


      }else if(inputString.substring(0,3)=="%A#"){
         Serial.println("Forward");
          //  stretch out the arm
          for(pos2;pos2<130;pos2++)
          {
            myservo2.write(pos2);
            delay(5);
          }
          delay(1000);

      }else if(inputString.substring(0,3)=="%B#"){

         Serial.println("Left");
         for(pos1;pos1<150;pos1++)
          {
            myservo1.write(pos1);
            delay(5);
          }
          delay(1000);

      }else if(inputString.substring(0,3)=="%C#"){
         Serial.println("Right");
         for(pos1;pos1>30;pos1--)
         {
            myservo1.write(pos1);
            delay(5);      // delay 5ms(used to adjust the servo speed)
         }
         delay(1000);
      }else if(inputString.substring(0,3)=="%D#"){
         Serial.println("Backward");
          // retracte the arm
          for(pos2;pos2>80;pos2--)
          {
            myservo2.write(pos2);
            delay(5);
          }
          delay(1000);

      }else{
        Serial.println("Default");
         // open the claw
       for(pos4;pos4<120;pos4++)
       {
         myservo4.write(pos4);
       }
        delay(1000);
      }
      inputString = "";   // clear the string
      newLineReceived = false;
}

}
Code for my PS2 joystick sensor modification:
#include <Servo.h> // add the servo libraries
Servo myservo1; // create servo object to control a servo
Servo myservo2;
Servo myservo3;
Servo myservo4;
int pos1=90, pos2=90, pos3=90, pos4=90; // define the variable of 4 servo angle,and assign the initial value (that is the boot posture
//angle value)
const int right_X = A2; // define the right X pin to A2
const int right_Y = A5; // define the right Y pin to A5
const int right_key = 7; // define the right key pin to 7(that is the value of Z)
const int left_X = A3; // define the left X pin to A3
const int left_Y = A4; // define the left X pin to A4
const int left_key = 8; //define the left key pin to 8(that is the value of Z)
int x1,y1,z1; // define the variable, used to save the joystick value it read.
int x2,y2,z2;

void setup()
{
// boot posture
myservo1.write(pos1);
delay(1000);
myservo2.write(pos2);
myservo3.write(pos3);
myservo4.write(pos4);
delay(1500);
pinMode(right_key, INPUT); // set the right/left key to INPUT
pinMode(left_key, INPUT);
Serial.begin(9600); // set the baud rate to 9600
}
void loop()
{
myservo1.attach(3); // set the control pin of servo 1 to D3  dizuo-servo1-3
myservo2.attach(5); // set the control pin of servo 2 to D5  arm-servo2-5
myservo3.attach(6); //set the control pin of servo 3 to D6   lower arm-servo-6
myservo4.attach(9); // set the control pin of servo 4 to D9  claw-servo-9
x2 = analogRead(right_X); //read the right X value
y2 = analogRead(right_Y); // read the right Y value
z2 = digitalRead(right_key); //// read the right Z value
x1 = analogRead(left_X); //read the left X value
y1 = analogRead(left_Y); //read the left Y value
z1 = digitalRead(left_key); // read the left Z value
//delay(5); // lower the speed overall

// claw
claw();

// rotate
turn();

// upper arm
upper_arm();

//lower arm
lower_arm();
}

//claw
void claw()
{
//claw
if(x1<50) // if push the left joystick to the right
{
pos4=pos4+3;
myservo4.write(pos4); //servo 4 operates the motion, the claw gradually opens.
delay(5);

if(pos4>120) //limit the largest angle when open the claw
{
pos4=120;
}
}

if(x1>1000) ////if push the right joystick to the left
{
pos4=pos4-3;
myservo4.write(pos4); // servo 4 operates the action, claw is gradually closed.
delay(5);
if(pos4<45) //
{
pos4=45; //limit the largest angle when close the claw
}

}
}

// turn
void turn()
{
if(x2<50) //if push the right joystick to the let
{
pos1=pos1+3;
myservo1.write(pos1); // arm turns left
delay(5);
if(pos1>180) //limit the angle when turn right
{
pos1=180;
}

}

if(x2>1000) // if push the right joystick to the right
{
pos1=pos1-3;
myservo1.write(pos1); //servo 1 operates the motion, the arm turns right.
delay(5);
if(pos1<1) // limit the angle when turn left
{
pos1=1;
}
}
}

// lower arm
void lower_arm()
{
if(y2>1000) // if push the right joystick downward
{
pos2=pos2-2;
myservo2.write(pos2); // lower arm will draw back
delay(5);
if(pos2<25) // limit the retracted angle
{
pos2=25;
}
}

if(y2<50) // if push the right joystick upward
{
pos2=pos2+2;
myservo2.write(pos2); // lower arm will stretch out
delay(5);
if(pos2>180) // limit the stretched angle
{
pos2=180;
}
}
}

//upper arm
void upper_arm()
{
if(y1<50) // if push the left joystick downward
{
pos3=pos3-2;
myservo3.write(pos3); // upper arm will go down
delay(5);
if(pos3<1) //  limit the angle when go down
{
pos3=1;
}
}
if(y1>1000) // if push the left joystick upward
{
pos3=pos3+2;
myservo3.write(pos3); // the upper arm will lift
delay(5);

if(pos3>135) //limit the lifting angle
{
pos3=135;
}
}
}
Code for my potentiometer control modification:
#include<Servo.h>

Servo servo1;
Servo servo2;
Servo servo3;
Servo servo4;
int potPin1 = 0, potPin2 = 1, potPin3 = 2, potPin4 = 3;
int reading1, reading2, reading3, reading4;

void setup() {
  // put your setup code here, to run once:
  Serial.begin(9600);

  servo1.attach(8);
  servo2.attach(9);
  servo3.attach(10);
  servo4.attach(11);
}

void loop() {
  // put your main code here, to run repeatedly:
  reading1 = analogRead(potPin1);
  reading1 = map(reading1, 0, 1023, 0, 180);
  servo1.write(reading1);
  delay(2);
  reading2 = analogRead(potPin2);
  reading2 = map(reading2, 0, 1023, 50, 160);
  servo2.write(reading2);
  delay(2);
  reading3 = analogRead(potPin3);
  reading3 = map(reading3, 0, 1023, 0, 50);
  servo3.write(reading3);
  delay(2);
  reading4 = analogRead(potPin4);
  reading4 = map(reading4, 0, 1023, 80, 130);
  servo4.write(reading4);
  delay(2);

}